Claude & MCP
Add Kolvera as a connector
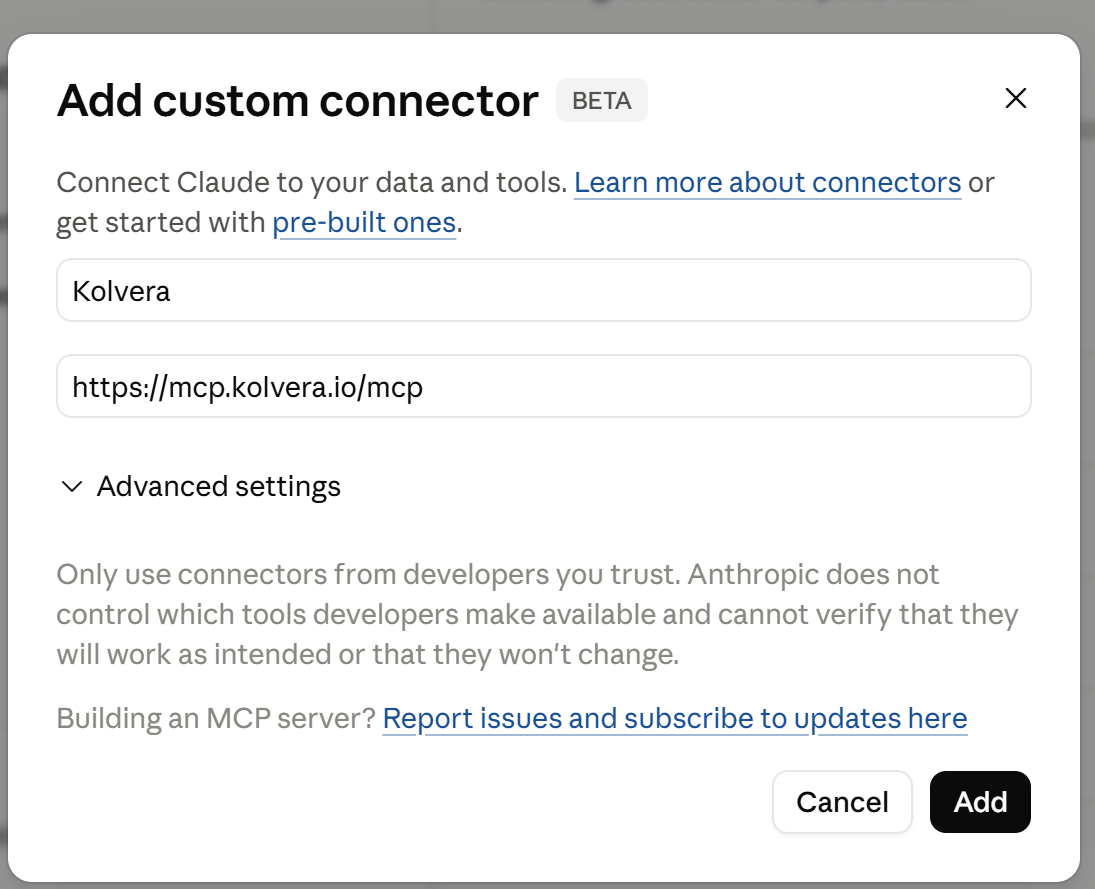
claude.ai & DesktopNo API token, no config file. Claude registers itself — you just sign in to Kolvera once to authorise. Paste this connector URL:
https://mcp.kolvera.io/mcp
In Claude, click your name (bottom-left) → Customize → Connectors, then click Add custom connector.
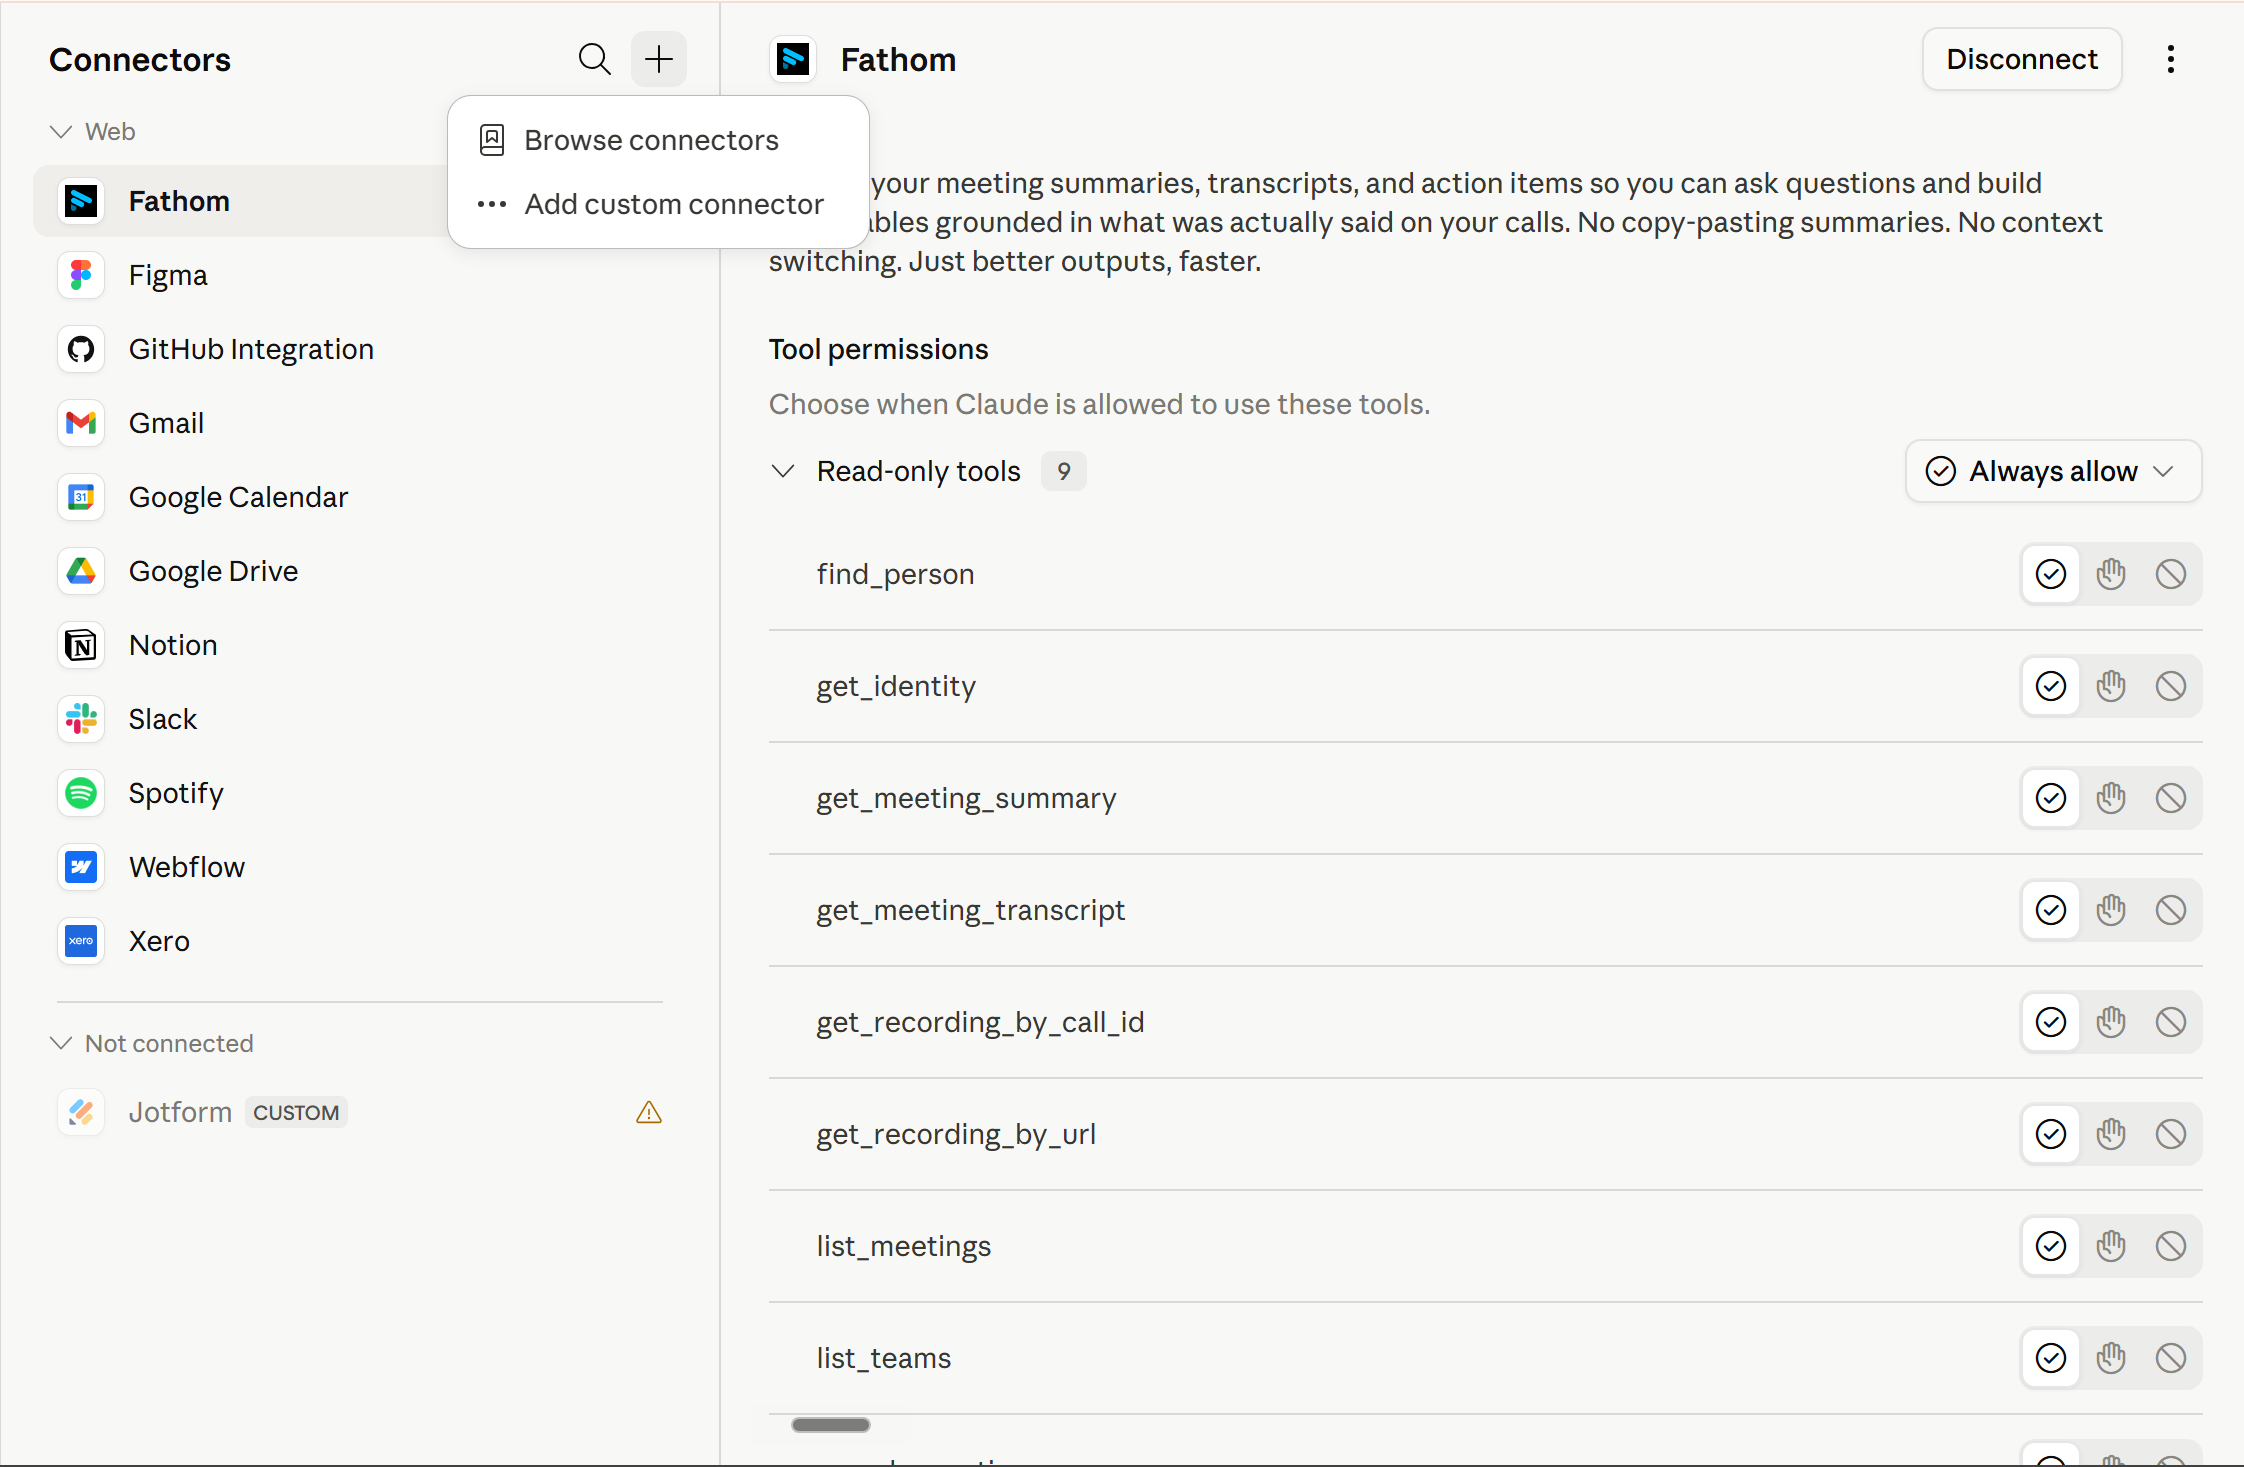
Name it Kolvera, paste the URL above, and click Add.
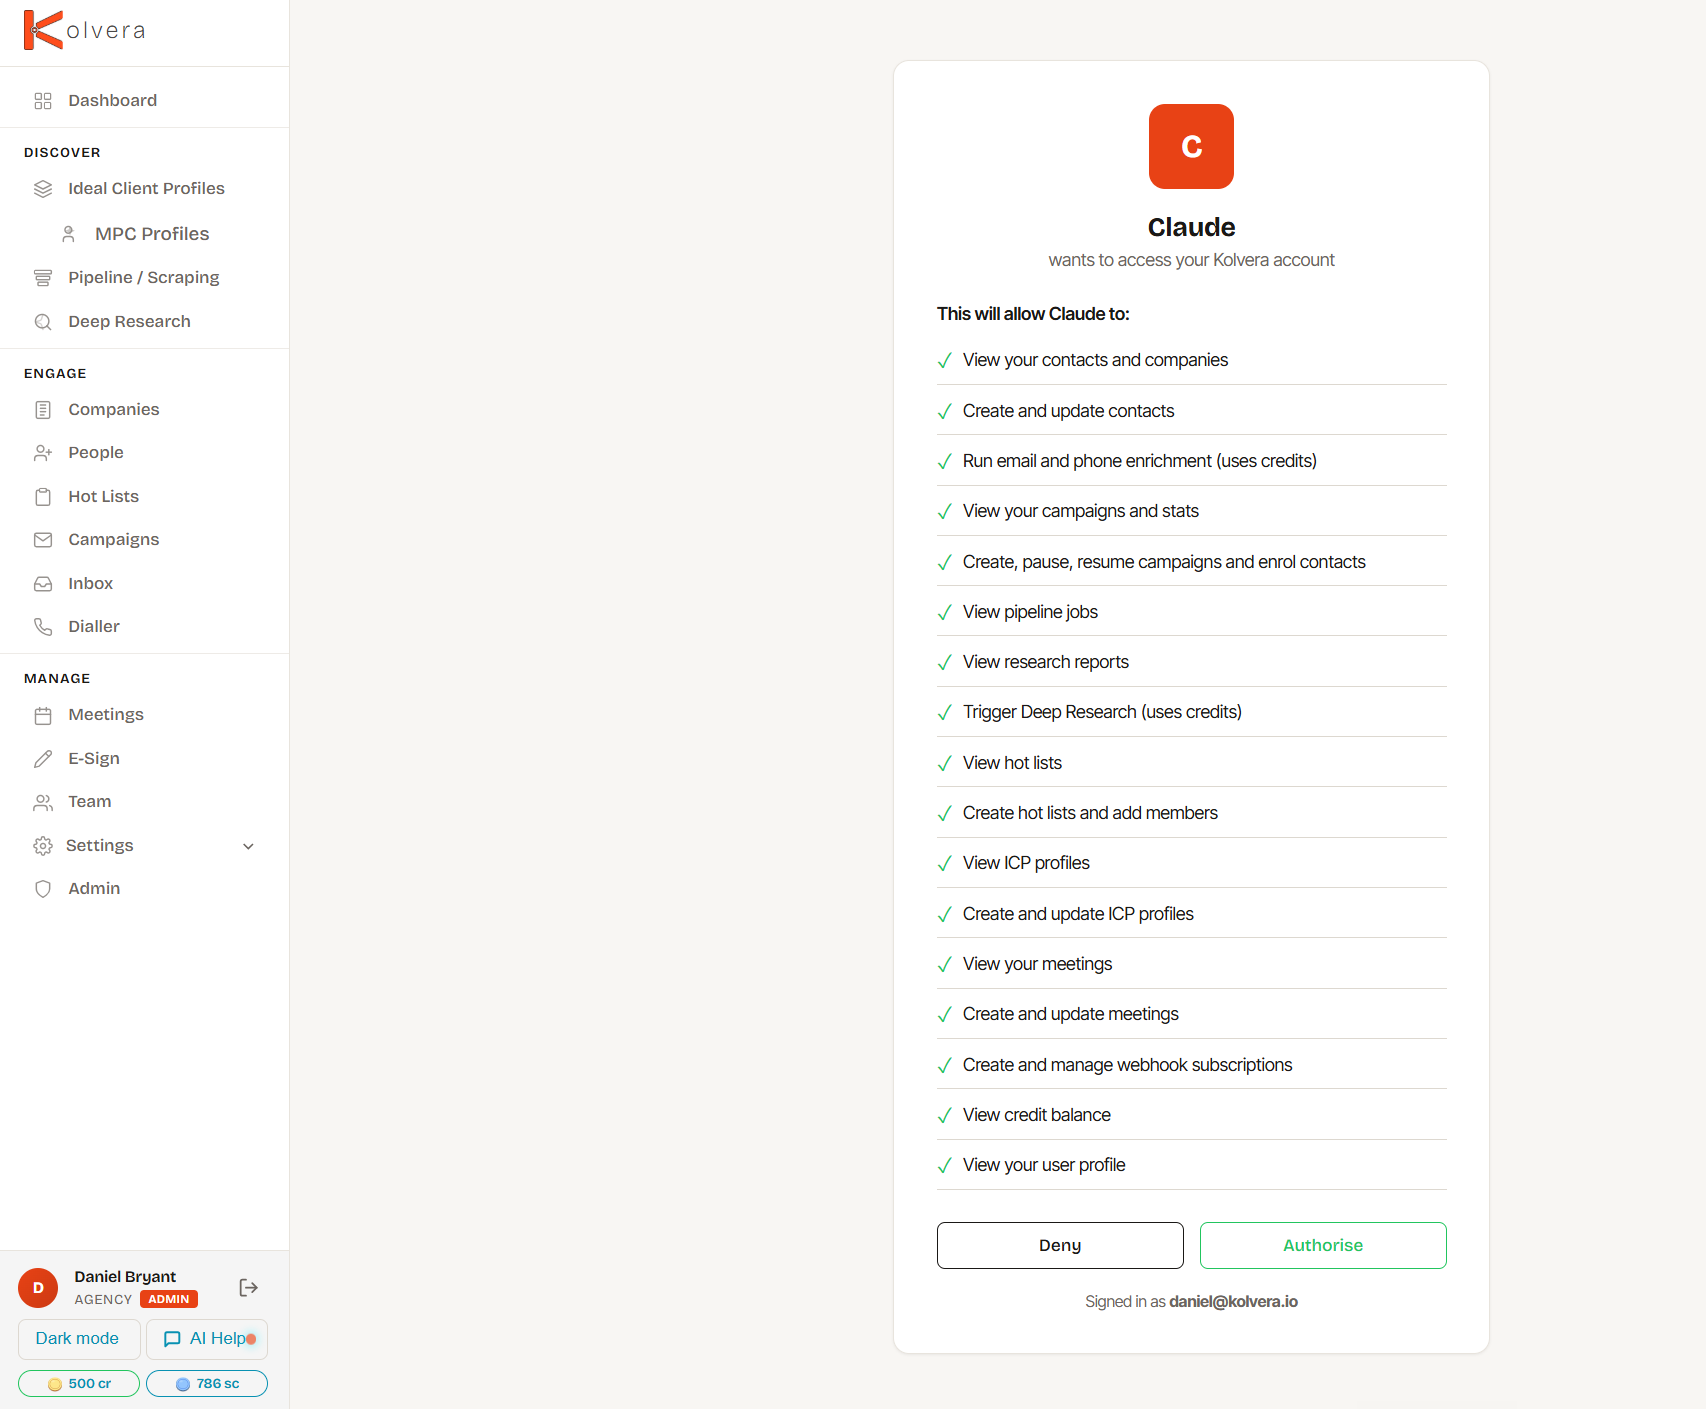
Sign in to Kolvera and click Authorise — that's it. Kolvera's tools are now in Claude.
Last step: in any chat, open the + menu → Connectors and switch Kolvera on — its tools are now live in that conversation.
Using Claude Code, Cursor or Windsurf? They connect with an API token — see Advanced setup below.
Give Claude the playbook
Add this PDF to your Claude Project to give Claude instructions on best practices — every tool, every workflow, and the T.I.P.S. email framework. Claude then follows it automatically across the whole project.
Pre-built skills
Free & open-sourceA skill is a packaged workflow Claude runs on a trigger phrase — the right Kolvera tools, in the right order, with approval gates. Say “map the market for AU fintech” and Claude builds the whole pipeline. No prompt engineering, no clicking around the app. They're free and open-source at github.com/kolverahq/kolvera-skills.
Skills run in Claude's code sandbox, so turn it on first: Settings → Capabilities → “Code execution and file creation”. Skills are available on Claude's paid plans (Pro, Max, Team, Enterprise) — on Team or Enterprise an admin enables Skills + Code execution for the workspace.
Pick a skill from the list below and download its zip from the skills repo (each has a one-click download).
In Claude, open Customize → Skills → +, choose Upload a skill, upload the .zip, and toggle it on.
Say the trigger phrase — e.g. “Map the market for commercial cleaning in Melbourne.” Claude runs the whole workflow, checking in with you at each gate.
New here? Start with map-the-market, icp-review, and campaign-build — they cover most of the work. The skills group into the same three jobs as working a market in Kolvera:
Find — build your market & surface targets
The full pipeline end-to-end: ICP → Deep Research → job scraping → contacts → hot lists.
Audits your targeting — tightens industries, sharpens exclusions, fills gaps.
Discovers companies you didn't know existed, with smart stop rules so you don't waste credits.
Runs SEEK / LinkedIn / Indeed scrapes, filters results, finds who's actively hiring.
Single-company deep dive: AI research, decision-makers, hiring signals, recommended approach.
Organize — enrich, sort, segment, keep records clean
Finds decision-makers at your targets, with verified emails and phone numbers.
Classifies contacts into prospects, candidates, and junk; links them to the right profiles.
Dedupes, classifies by title, finds emails, builds hot lists.
Segments people into S/A/B tiers, ready for outreach.
Manage stages, grades, notes, and next actions across your candidate pipeline.
Flags stale records, surfaces next actions, recommends adjustments.
Engage — run outreach & keep momentum
Multi-step email campaigns with the T.I.P.S. framework — copy, inboxes, enrolment, activation.
Take one person to market end-to-end: build their profile → match companies → find buyers → launch.
Fast health check — flags bounces, low opens, inbox problems, dead campaigns.
Daily digest: meetings, replies, follow-ups, pipeline alerts, top 3 priorities.
End-of-week synthesis: what moved, what's hot, where to focus next week.
Add the behaviour layer: the guidelines skill makes every other skill consultative — it reviews your setup, flags what's weak, and confirms before spending credits. Upload it once. Don't want to pick? Grab the download-everything bundle and add the ones you want.
What you can do
Once connected, just describe what you need — no forms, no clicks.
Try this first: map a market and fill your pipeline
Describe your target market in one line, set a credit budget, and Kolvera builds the whole pipeline — segments, companies, live hiring signals, decision-makers — while you watch. Copy this, fill the blanks, paste into Claude.
Map my market and fill my pipeline.

First, create a business context from my website: [your-website-url]

Then map a new target market: [describe your target market in one line, e.g. "AU accounting firms 10-50 employees that do advisory work"]

Set a budget of [X] credits and [Y] scrapes.

Once the segments are generated, show them to me for confirmation. After I confirm:

1. Run Deep Research to find companies, then keep expanding until diminishing returns
2. Sort the companies into their segments
3. Scrape SEEK, Indeed, and LinkedIn for live roles — run all three at the same time
4. Generate a Market Intelligence report once the roles are in
5. Find the decision-makers at the top-tier companies
6. Pull the BD Brief so I can review everything in one place

Check in with me at each gate but keep moving between gates without waiting.
Claude already has the full workflow guide and tool reference built in — just ask “show me the workflow guide”.
Advanced setup — Claude Code, Cursor & Windsurf (API token)
Clients that don't support one-click connectors authenticate with an API token. Your token uses the same credits as the dashboard.
Step 1 — Create an API token
- Go to Settings → API Tokens in Kolvera
- Click Create Token and name it (e.g. "Claude")
- Copy the
kv_...token — you only see it once
Claude Desktop (Mac & Windows)
Settings → Developer → Edit Config, then add Kolvera to claude_desktop_config.json:
{
  "mcpServers": {
    "kolvera": {
      "command": "npx",
      "args": [
        "mcp-remote",
        "https://mcp.kolvera.io/mcp?token=YOUR_KV_TOKEN"
      ]
    }
  }
}
Replace YOUR_KV_TOKEN with your kv_... token and restart Claude Desktop. Requires Node.js (the npx mcp-remote bridge handles the rest). Note: Desktop also supports the one-click connector above — the token route is only needed for older versions.
Claude Code / Cursor / Windsurf
Add a .mcp.json in your project root (or home directory):
{
  "mcpServers": {
    "kolvera": {
      "command": "npx",
      "args": [
        "mcp-remote",
        "https://mcp.kolvera.io/mcp?token=YOUR_KV_TOKEN"
      ]
    }
  }
}
In Claude Code, run /mcp to connect. Kolvera's tools appear in your tool list.
192 tools available
Every feature in the Kolvera dashboard is accessible through MCP. Key categories:
Full reference: API & Integrations Guide
FAQ
No. MCP access is included on all plans, including the free trial. You use your existing Kolvera credits — enrichment, research, and campaigns are charged at standard rates (2cr email, 2cr phone, 1cr research).
Claude Pro, Team, and Enterprise plans support MCP connectors. claude.ai and Claude Desktop use the one-click connector; Claude Code, Cursor and Windsurf use an API token.
Yes. The connector uses OAuth (or token) authentication. Each request is authenticated and isolated to your tenant — no data is shared between accounts. The server runs in Sydney (ap-southeast-2) alongside your Kolvera data.
Re-authorise the connector in Settings, or in Claude Code run /mcp to reconnect. Connections can briefly drop during server updates (usually <30 seconds).
Yes. The server uses the open Model Context Protocol — it works with any MCP-compatible client, including Cursor, Windsurf, Cline, and custom apps.
Don't have a Kolvera account yet?
Free trial · 50 credits included · no credit card required.
Start Free Trial